[Tip] Get Classic MS Paint (without Ribbons) Back in Windows 7 and Later
Recently we told you how to get classic Wordpad program in Windows 7 and later OS:
[Tip] Get Classic Wordpad (without Ribbons) in Windows 7 and Later
Now its turn of restoring the good ol’ classic MS Paint program in Windows 7 and later:
Advertisement

Get Classic Paint Program Without Ribbon UI in Windows 7:
If you have Windows Vista installed along with Windows 7 in your computer, you can directly run the “mspaint.exe” file present in “C:\Windows\System32” folder and it’ll run the old Paint without any problem.
If you don’t have Windows Vista installed, you can download the classic MS Paint program from following link:
Download Classic MS Paint Program
You can create a shortcut of Paint EXE file at Desktop or pin the shortcut to Taskbar or Start Menu for quick and easy access.
Replace New Paint App with Classic Paint in Windows 7:
If you want to completely replace the new Paint in Windows 7 with the old Paint program, you can follow these simple and easy to use steps:
1. Open following folder:
Advertisement
C:\Windows\System32
You can also open it by typing the path in RUN dialog box and press Enter.
2. Now take ownership of “mspaint.exe” file. To take ownership, check out following tutorials:
[Guide] How to Take Ownership (Permission) of a File or Folder Manually in Windows?
Add Take Ownership Option in File / Folder Context Menu in Windows Vista and 7
3. Now rename the “mspaint.exe” file to “mspaint_backup.exe“.
4. Now copy “mspaint.exe” file from downloaded ZIP file and paste it in “C:\Windows\System32” folder.

5. Now go to “en-US” folder and take ownership of “mspaint.exe.mui” file. After taking ownership rename the file to “mspaint_backup.exe.mui“.
6. Now copy “mspaint.exe.mui” file from downloaded ZIP file and paste in “C:\Windows\System32\en-US” folder.
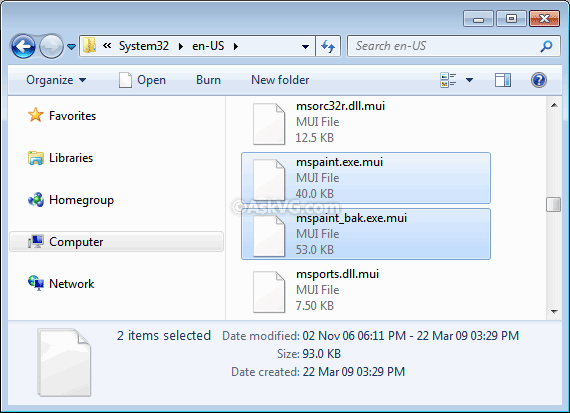
NOTE: If you are using a different language edition of Windows, replace the mspaint.exe.MUI file in your local language folder as well. For example, Czech locale users will need to replace mspaint.exe.MUI file in cs-CZ folder along with en-US folder.
7. If you are using 64-bit Windows edition, you’ll also need to replace both mspaint.exe and mspaint.exe.mui files present in “C:\Windows\sysWOW64” and “C:\Windows\sysWOW64\en-US” folders using the same steps as mentioned above.
That’s it. Now Windows 7 will start using the old Paint program.
If you want to restore the new Paint app in future, simply delete the new “mspaint.exe” and “mspaint.exe.mui” files and then rename the backup files to their default names.
PS: If you face problems while following this tutorial, check out following video showing complete method live in action:
Also Check:
I’ve just applied this to windows 10 and can confirm it still works there as well. Hooray!
can u post a tutorial of getting windows 8 mspaint on windows 7? win8 version fixes the scrolling bug.
^^ Same steps. Just grab both EXE and MUI files from a Windows 8 computer and save them in Windows 7.
Yeah my situation is quite strange. Ok the download was fine and the program runs perfectly with no issue. However when I save with the old version paint and then try to open the saved file it only allows the new version to open it. That’s not the strange part. What’s strange is that when I click the saved file properties to go change the program it opens, in there appears the new version so I click on to browser to find the old one, I find it nice and easy right click, click select and then not only my selected program don’t appear among other programs or recommended, but it automatically highlights the new version. So I can’t select the old version as an open default program for any already saved paint file. Another thing the old version don’t appear on any of the program associations in control panel either. Any idea what’s going on?
When i open paint it says “Unable to create new document”
WOOO!! This is great, thanks.
I’m hating windows 10 and its screwy line options.
Used this method on Windows 8.1 and it worked wonders! I wanted to do it again after upgrading to Windows 10, but now it won’t quite work properly – after going through all the steps described here, I keep getting an “Unable to create new document” error and the program won’t open. Any tips on how to tackle this? Thanks in advance!
Hi, can you pls post the mspaint for windows 8/8.10? I wanna revert to it but I deleted my backup. thanks
I tried using this on Windows 10 (x64), but I too kept getting the “Unable to create new document” message, even if I loaded the EXE in compatibility mode.
This, however, worked for me: Vishal Gupta’s modded, Vista-skinned Paint for Windows XP. Get it here: https://www.askvg.com/get-windows-vista-look-like-mspaint-in-windows-xp/
Thanks so much for this. Works fine for me. I’m a ribbon hater too. Don’t understand why every interface has to be like “cow goes moo” anymore. Are these software makers trying to dumb us down or is it the other way around.
Hi,
Thank you for this tutorial. I managed to install the old-style MS Paint. However, the color box appears at the top of the window, and I’d like it to be at the bottom, like shown in the article. But I can’t for the life of me figure out how to move it.
Any ideas?
Thank you.
^^ Try the registry script given in following tutorial:
https://www.askvg.com/get-windows-vista-look-like-mspaint-in-windows-xp/
It worked! It looks perfect now.
Thank you.
Help me, it doesn’t have take ownership on mspaint.exe
hello,
help when i open paint it says “Unable to create new document”
what should be done ?
thanks
Help me, I do not have mspaint.exe
It’s just mspaint
In response to nycole:
I think this method is a bit old, I would suggest finding a new method
If you want to see the filenames, open file explorer, click view and click the checkbox next to ‘File Name Extensions’. I would also recommend checking the other two options as well, they are quite useful.
-Toonlabs
Hello,
Thanks for the guide!
Is there any way to get it without downloading? I’m on the computer at work and cannot download or transfer any .exe files because of security concerns…
got it to work for windows 10
thanks so much!
ok so muxh
much*
Is there a way to automatically silent install Classic MS paint. Maybe using SetACL.exe. But I don’t know the proper commands.
I found and used this solution a few years ago and tried it. Everything worked just fine.
Yesterday I ran sfc /scannow for a problem I had and now when I double click an existing paint document it comes up with an error saying unable to create new docuement.
It does not do this if I click on the shortcut or go into the system 32 folder on the C drive.
I can drag the image and drop it on the shortcut to open it that way.
Why might it be saying could not create new document?
I have followed the steps and I have the 64 bit version of windows 8.1.
This was not only completely workable, but I have to say, the directions were well explained.
you don’t know how happy this makes me god bless you for this!
Bonjour,
Comment mettre paint en français ?
est-ce que c’est possible ?
merci
Hello,
How to put paint in French?
is it possible ?
thank you
The most recent version of Paint, Version 1909, Build 18363,1139, has some problems. Yo can no longer grab small sections of the image to stretch or move them. Also, when moving images with the arrow keys, the images “take off” much too quickly, making single-pixel moves difficult. Is there any way to recover the version just prior to this one for Windows 10 machines?
^^ You can copy the above mentioned Paint files from any previous Windows 10 version PC and paste them in your PC.
Thank you for good old Microsoft Windows Paint Application (which, uh, I kinda think it’s from Windows 3.1/Windows 95 all the way to the Windows Vista)
This masterpiece runs on Windows 11 too, and it’s nostalgic, easy to use too.
Thank you – I managed to get this working on Windows 10. I am not sure how I did it, as I repeated a lot of tries, got lots of can’t create documents, but now I have it pinned to Start and the taskbar and it works.