[Tip] Add “Take Ownership” Option in Files and Folders Context Menu in Windows
Many times you need to take ownership of a file or folder in Windows. For example, when you want to customize Windows UI and need to replace existing system files with a new one.
You have to follow number of steps to take ownership and grant yourself full permission and control to access the file or folder. But now you can do it in a single step.
You just need to download following zip file and extract it. You’ll get a .REG file. Run the file and accept the confirmation:
Advertisement
It’ll add an extra option “Take ownership” in file and folder context menu:
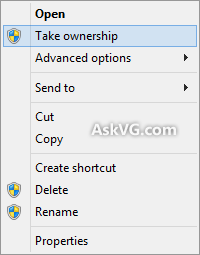
Now you can right-click on any file or folder and select “Take ownership” option. It’ll make you the owner of the file or folder and you can perform your desired operation on that file or folder.
An extra uninstallation registry script is also available in the ZIP file in case you want to remove the option from context menu.
PS: If you want to know what kind of command does the context menu option “Take Ownership” execute when you click on it, here is some interesting information for you:
We have assigned 2 commands to the context menu option, so whenever you click on “Take Ownership” option from context menu, it executes those 2 commands to take ownership of the file/folder and assign full control to you.
Advertisement
Following are the 2 commands which are run by the context menu option:
To take ownership and grant full permission on a file:
takeown /f filename
icacls filename /grant administrators:F
To take ownership and grant full permission on a folder:
takeown /f foldername /r /d y
icacls foldername /grant administrators:F /t
You can run the above mentioned commands in Command Prompt to manually take ownership and grant full permission and control on any desired file or folder via command-line. Just replace filename and foldername terms in the commands with the actual file name and folder name.
NOTE: If you face any problem while taking ownership of a file or folder using context menu option, you can try to take the ownership manually using the method given in following tutorial:
[Guide] How to Take Ownership (Permission) of a File or Folder Manually in Windows?
I want to play fortnite battle royale
Wow, A big thumbs up!!!
Since Saturday, I have been thinking of a way to recover the files. I have been an old user for Askvg but had forgotten about it. Yesterday, I had thought about this Wonderful Tool and viola!!! My files are there!!! Thank You Askvg!!! Strongly recommend this to people who use hundreds of dollars to recover data rather than accessing themselves
Thank you very much for the article and the .reg file.
Question/Suggestion:
– A logfile of all actions performed by the command would be helpful
no option exe file
you made the life hard.
^^ The option was not added to EXE file because it’ll overwrite the “Run ad Administrator” functionality.
useful, it works instantly. will save .reg files in google drive
I did a Bios update & a Windows update same day, after that my pin sign-in never worked again. Tried for a week to solve this problem. “Take ownership” did the trick. Thank You very much!
The above did not give me access to my old OneDrive folder in Windows 10. I was able to take ownership. But the next command did not work.
I have Win10 System install failed. installed a new drive and reinstalled Win10. I imported the old system drive as a third drive hoping to recover otherwise lost files. But cannot access the Old OneDrive folder in my user folder.
HELP!
^^ Try to manually take ownership:
https://www.askvg.com/guide-how-to-take-ownership-permission-of-a-file-or-folder-manually-in-windows/
OMG thank you a lot. I used a script from someone on reddit to get ownership to delete DPFT, but after that I couldn’t install any software anymore and some software didn’t start.
I searched forever and your uninstall reg worked like a charm and my problem is solved. I thought already I need to install my windows new!!!! Thanks a ton 🙂
After two days of trying other online “solutions”, those two admin command line commands worked. Yay! Thanks.
After I push take ownership it asks what program to use now what program do i want to use to take ownership of the hostfile in system32 ?
It’s works wonderful. Thank you so much!
Absolutely brilliant. Thanks you soooooo much!
Even in 2020 it’s working, thank you so much! 🙂
YOU ARE A BOSS THANK YOU
Thanks a lot !!!
I was trying to remove recovery folder from my drive. it worked using the description here.
Really appreciated !!
Hi there,
Buddy, you just saved me from a lot of headaches. Today I connected my old Windows 7 hard drive in my Windows 10 laptop thinking that I would get access to my old files, but things went completely in the opposite direction. I was tried out all types of workarounds but none of them worked.
I was literally disheartened and didn’t know what to do when I came across your article from a Microsoft community. Likewise, I followed the instructions and voilà. Now I can access and open all the files from the old hard drive.
Thanks a lot 🙂
Awesome! Thank you so much! 🙂
Wow. Thanks man. It helped.
THANK YOU SO MUCH OMG
A very BIG Thank You
Solved a very annoying problem for me.
Hi sir, I’m trying to delete k7 antivirus shortcut in my desktop. even after i installed take ownership, i can’t find take ownership option when i right click the K7TSMAIN.exe. is there a way i could delete the shortcut file without uninstalling the antivirus.
^^ Please check following to take ownership of EXE files:
https://www.askvg.com/guide-how-to-take-ownership-permission-of-a-file-or-folder-manually-in-windows/
This helped me get rid of an old windows install on an old SSD that wouldn’t delete no matter what I did.
This program did the trick, thanks for real
will this work with win11?
^^ Of course.
Wow that take ownership script is legendary!!!
Wow, this worked for me when nothing else would. Thank you very much!
Thank you so much, this was a great help, a nice single file and all the problems solved