Simple Trick to Replace Default Built-in “Flower” Profile Picture for All User Accounts in Windows
UPDATE: This method also works in Windows Vista and Windows 8 and Windows 8.1. Thanks to our readers “MasterDevil” and “Swapnil”…
I was looking into various system files using Resource Hacker to find a BITMAP file. Although I couldn’t find that particular BITMAP file but found something interesting which I would like to share in this topic.
When you install Windows 7 in a new computer system or create a new user account in Windows 7, by default Windows assigns built-in “Flower” image as profile picture for the new user account.
Advertisement
You can change this profile picture using User Accounts applet in Control Panel. But if you have many user accounts in your computer and want to set your desired image or company logo as user profile picture for all accounts in a single step, this tutorial will definitely help you.

Today we are going to share a very simple and secret trick which will allow you to replace default built-in flower profile picture with your desired image so that if you create a new user account in Windows, the new account will have your desired image as its profile picture instead of default flower picture.
We are not going to use any registry trick or Resource Hacker trick in this tutorial. We’ll just replace an existing BITMAP file with our desired BITMAP file.
So without wasting time, lets start the tutorial:
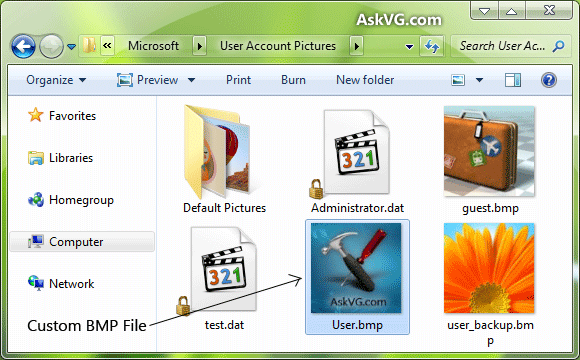
1. The default flower profile picture is actually a BITMAP file which is stored in following folder:
%ProgramData%\Microsoft\User Account Pictures\
Advertisement
PS: Copy the above string and paste in RUN or start menu search box and press Enter. It’ll directly open the folder in Explorer window.
The BITMAP file name is user.bmp and its a 128×128, 24-bit bitmap file.

2. We just need to create a new BMP file in an image editing software like MS Paint, Adobe Photoshop, GIMP, etc but we’ll keep its size 128×128 pixels similar to default BITMAP file.
3. Once you finish creating the desired BITMAP file, save it at any location with user.bmp file name.
4. Now you’ll need to replace existing user.bmp file present in “User Account Pictures” folder mentioned in STEP 1 with your newly created BMP file.
Before replacing default user.bmp file, you should create a backup of the file so that you can restore it later if you want. To take a backup, you can simply rename it to any other name like user_backup.bmp.
Now copy new user.bmp file to “User Account Pictures” folder.
5. That’s it. Since you have replaced default BITMAP file with your new one, now all new and existing user accounts which have their profile picture set to default flower picture will automatically start showing new picture which you created in STEP 2.

If your existing user account doesn’t show new picture, restart or log off and it’ll start using new BITMAP as profile picture.
BONUS TIP: All other profile pictures which are shown when you click on “Change your picture” link in User Accounts applet of Control Panel, are stored in “%ProgramData%\Microsoft\User Account Pictures\Default Pictures” folder. If you want to customize all of them, you can follow above mentioned steps for each BITMAP file.
BONUS TIP 2: You can also customize profile picture for “Guest” account by replacing guest.bmp file present in same folder mentioned in STEP 1.
PS: I don’t have Windows XP and Vista installed, so can’t check this trick in both OS. If you have Windows XP or Vista, please check this method and let me know if it also works in XP and Vista or not.
If you have any query or suggestion, please feel free to share it in your comment…
This doesn’t work in Windows XP as it’s a little different.
To better explain, here is a screenshot-
files.myopera.com/Swapnil99pro/files/winxpusernamepics.JPG
As you can see in the above screenshot, there are separate images for each user.
But the BONUS TIP 2 would obviously work.
Thanks for the feedback everyone. Much appreciated. 🙂
I think the trick should work in Windows Vista as Windows 7 and Vista are quite similar.
“I think the trick should work in Windows Vista as Windows 7 and Vista are quite similar.”
Oh yes it does. Just tried it now. It works perfectly on an up-to-date Windows Vista SP2 installation.
What program are those dat files associated with?
OK, I’m confused. Why would have to go through all this to change the account picture? OK, I got it now. It is to change the default account picture for ALL user accounts. Got it now.
for xp open C:\Documents and Settings\All Users\Application Data\Microsoft\User Account Pictures
but for vista i am not sure about it
there you have to replace your account bitmap
“BONUS TIP doesn’t work in Windows 8.”
It would definitely. Actually both the BONUS TIPS work in Windows XP too.
But for BONUS TIP 1, in Windows XP the folder is
C:\Documents and Settings\All Users\Application Data\Microsoft\User Account Pictures\Default Pictures\
If the BONUS TIP(S) don’t work in Windows 8 – it’s most probably a bug or Microsoft has changed the folder for storing all User Account Pictures.
You legend, saving me all that time like that – too kind.
Some program or I think virus has replaced all of my picture icons with some dume flower, can someone tell me how to get pass this. I am not concerned with the user account flower.
Thank you very much! Best solution ever! Tried lots of tools and apps, this is the best way. Have a nice day!
Thx, how many pictures can you put there though?
What if I don’t have access to user.bmp and cannot be renamed.
^^ You can try to take ownership:
https://www.askvg.com/guide-how-to-take-ownership-permission-of-a-file-or-folder-manually-in-windows/
https://www.askvg.com/add-take-ownership-option-in-file-folder-context-menu-in-windows-vista/
Both TIPS works in Windows 7.
Have a nice day!
In Windows XP, the user account program is written in HTML, and can be edited to make it change to a different picture. I have edited it to make it look better and to make it more user friendly. Use ResHacker.
It’s actually a CPL file in Control Panel –
It works for me. I used it to change the guest account picture in Windows 7 because I did not like it. I also tried this on Windows 8 and it also works.
If you do it on 8 it’s a bit different as you have to have a bitmap and a PNG image for both the guest and user account. But it still works.
Just so you know.