Try This to Fix Internet and Network Connection Issues in Windows
This article contains all possible solutions to help you in fixing almost all kind of problems and issues related to Internet and network (LAN) connectivity in Windows operating system. Almost all methods given in this article will work in all Windows versions such as Windows 7, Windows 8, Windows 10 and Windows 11.
Many times we encounter issues while using Internet connection in our computer or while connecting to Local Area Network. It doesn’t matter which type of Internet connection you are using. It might be a high-speed Fiber broadband connection, Ethernet or Wi-Fi connection or a slower mobile data hotspot connection. You may face connectivity issues, slow Internet speed or receive random error messages while trying to connect to Internet.
Yellow triangle with exclamation mark (!) on network connection icon in Taskbar notification area is a very common issue faced by Windows users.
Advertisement
![]()
![]()
Other known and frequently encountered issues are empty or blank Network connections folder, some websites are not opening, “Connection doesn’t have a valid IP configuration”, “One or more network protocols are missing on this computer”, “Windows sockets registry entries required for network connectivity are missing”, “You’ll Need the Internet for This”, “Limited Connectivity” or “No Internet Access” error messages.

Similarly you might be unable to connect your PC to a network and receive random error codes.
In past, we have posted several tutorials to address issues related to Internet and network connectivity. Recently a reader “Om” requested me to post an all-in-one article containing list of all possible solutions to resolve Internet and network problems. I liked the idea and decided to create this exclusive tutorial.
This article contains almost all possible solutions to help you in fixing issues while trying to connect to Internet or a network.
Advertisement
If you face any issue while using Internet or network connection in Windows, try the solutions given in this article and it’ll help you in fixing the issue.
Let’s start the tutorial:
Table of Contents
- 1. Disable Your Internet Security Suite or Firewall Program
- 2. Try Windows Built-in Network Troubleshooter Tool
- 3. Try to Use Custom DNS Server Settings
- 4. Disable or Turn Off Fast Startup (Hybrid Shutdown) Feature
- 5. Try Windows 10 and 11’s Network Reset Feature
- 6. Command Prompt Method to Reset Network Adapters and Settings
- 7. Uninstall and Reinstall Network Adapters Using Device Manager
- 8. Make Sure Required Services are Running in Windows
- 9. Registry Method to Clear Networking Configuration Cache in Windows
- 10. Registry Method to Fix Windows Sockets Entries
- 11. Registry Method to Reset Class Managers Key in Windows
- 12. Command-Line Method to Fix Network or Internet Issue
- 13. Disable or Remove Virtualization Software Adapter in Connection Settings
- 14. Try Solutions Given in Following Articles
1. Disable Your Internet Security Suite or Firewall Program
This is the first thing which you should do if you face any issue or error message while trying to connect to Internet or a network.
Almost all of us install 3rd party antivirus, Firewall or complete security suite (also known as total security, Internet security, etc) in our computers. Sometimes these security programs may cause annoying issues while connecting to Internet or networks.
If you receive error messages while connecting to Internet or unable to connect to any network, you should first try to disable your security program.
It might be possible that your security program is blocking a system service or a port from connecting to Internet and that’s why you are unable to connect to Internet or LAN.
All security programs whether it’s an antivirus, firewall or complete security suite, provide an option to temporary disable or pause their protection. You can find such option in program’s main window or its Taskbar icon’s context menu.
For example, if we right-click on NOD32 antivirus or security suite’s icon present in Taskbar notification area, we get an option to pause its protection as shown in following screenshot:

If you are using other security programs, you’ll find similar options in their context menus or main program window.
Disable their protection and then try to connect to Internet or network again and now it should work.
If disabling the security program trick works, then check security program’s settings and customize its protection to allow Internet or network connection.
If you can’t find any option to modify its protection, you can try to uninstall the program and switch to another security program.
2. Try Windows Built-in Network Troubleshooter Tool
Windows also comes with built-in networking troubleshooter tool to fix issues related to Internet and networks.
Right-click on network icon present in Taskbar notification area and select “Troubleshoot problems” option.

It’ll launch the troubleshooter tool which will detect and find any issues present in your system.
It’ll automatically fix issues and now you should be able to connect to Internet or networks.
3. Try to Use Custom DNS Server Settings
Sometimes there might be issues in the default DNS server provided by your ISP (Internet Service Provider). Using custom DNS server settings may fix the issue.
Following article will help you in using custom DNS settings in Windows:

How to Change or Use Custom DNS Server Settings in Windows?
4. Disable or Turn Off Fast Startup (Hybrid Shutdown) Feature
Sometimes Windows 10 and Windows 11’s built-in “Fast Startup” feature might also cause Internet and network connectivity issues. You can try to disable Fast Startup functionality as mentioned in following article:

[Fix] Lost Internet Access in Windows 10 After Feature Update Installation
5. Try Windows 10 and 11’s Network Reset Feature
Windows 10 and Windows 11 come with a Network Reset feature to fix common and known connection issues. It automatically resets network adapters and networking components settings. It first removes all installed network adapters and then reinstalls them. It also sets other networking components back to their original settings.
1. Open Settings app from Start Menu or by pressing WIN+I keys together.
2. Now go to Network & Internet section and under Status tab, click on Network Reset link given at the bottom of right-side pane.
PS: Alternatively, You can directly launch this page using “ms-settings:network-status” command in RUN dialog box as mentioned here.

3. Now click on “Reset Now” button to start network reset feature.
4. It’ll show a confirmation message “Are you sure you want to reset your network settings?“, click on “Yes” button to accept the confirmation.
That’s it. It’ll reset network adapters and settings and will restart your computer to take effects.
Details: [Windows Tip] Use “Network Reset” Feature to Fix Internet Connection Issues
After restart, try to connect to Internet or LAN and now you should not face any problem or error message.
6. Command Prompt Method to Reset Network Adapters and Settings
If you are using a different Windows version and can’t use above mentioned Network Reset feature, following command-line method will help you in resetting network adapters and restoring networking settings to factory defaults:
1. Open Command Prompt as Administrator and run following commands one by one:
netsh winsock reset
netsh int ip reset
netcfg -d
ipconfig /release
ipconfig /renew
ipconfig /flushdns
ipconfig /registerdns

2. Close Command Prompt window and restart your computer system.
After reboot, you should be able to get full Internet and network connectivity without any problem.
7. Uninstall and Reinstall Network Adapters Using Device Manager
You can also try to manually remove and then reinstall network adapters using Device Manager. It’ll restore network adapters configuration and might resolve the connectivity issue.
1. If you are using Windows 10 or Windows 11, press WIN+X keys together to launch WIN+X menu and select Device Manager option.
Alternatively, you can open Device Manager using devmgmt.msc command in RUN dialog box or Search box.
2. Now locate the Network adapters section.
3. Right-click on each network adapter one bye one and select Uninstall option from the context menu.
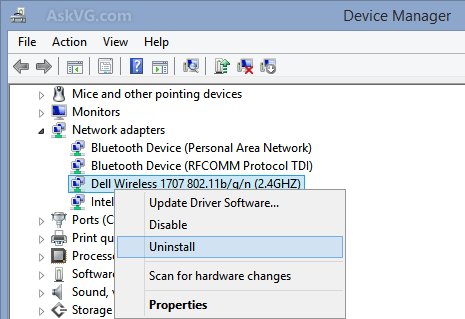
4. Once all adapters have been removed, right-click in Device Manager window and select Scan for hardware changes option.
All removed network adapters will be rediscovered or detected by Device Manager and Windows will reinstall the required drivers for them.
Restart your computer and it’ll fix the connectivity problem.
8. Make Sure Required Services are Running in Windows
Some services are required by Windows to provide Internet and network connectivity and if any of these services is disabled or not running in background, you might face issues.
Following steps will help you in enabling all required networking services in Windows:
1. Open Services Manager using services.msc command in RUN dialog box or search box or by using other methods as mentioned in STEP 1 of following tutorial:
[Guide] Which Windows 10 Services are Safe to Disable?
2. Now scroll down and look for following services:
- Computer Browser
- Function Discovery Provider Host
- Function Discovery Resource Publication
- Network Connections
- Peer Name Resolution Protocol
- Peer Networking Grouping
- Peer Networking Identity Manager
- UPnP Device Host
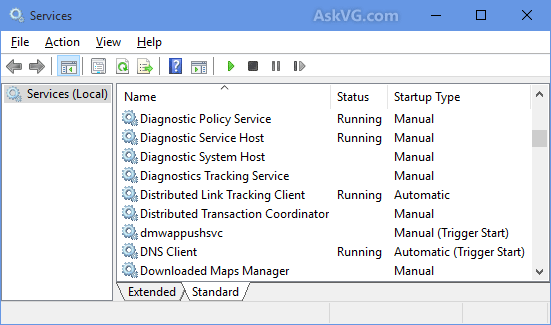
3. Double-click on each service entry and make sure that “Automatic” is selected in Startup type drop-down box.
If it’s not set to Automatic, change the startup type to Automatic and click on Apply button. Also click on Start button to immediately start the service.
Follow same steps for all above mentioned services.
Once you enable all above mentioned services, restart your computer to take effects. After restart, you should be able to connect to Internet or a network.
9. Registry Method to Clear Networking Configuration Cache in Windows
1. Type regedit in RUN or Start search box and press Enter. It’ll open Registry Editor.
2. Now go to following key:
HKEY_LOCAL_MACHINE\SYSTEM\CurrentControlSet\Control\Network
3. In right-side pane, you’ll see a binary key “Config“. Select it and press Delete key on your keyboard.

By deleting the Config key we are clearing the configuration cache.
Restart your computer system. Now Windows will automatically re-create the Config key.
PS: If you don’t want to edit registry manually and want a ready-made registry script to do the task automatically, download following ZIP file, extract it and run extracted REG file. It’ll ask for confirmation, accept it:
Download Registry Script to Clear Networking Configuration Cache
10. Registry Method to Fix Windows Sockets Entries
When we try to connect to Internet or a network, Windows checks for required Sockets entries in Registry. If these sockets entries are not present or corrupted, you may face issues while connecting to Internet or LAN.
Following steps will help you in restoring default sockets entries in Registry:
1. Type regedit in RUN or Start search box and press Enter. It’ll open Registry Editor.
2. Now go to following keys:
HKEY_LOCAL_MACHINE\SYSTEM\CurrentControlSet\Services\Winsock
HKEY_LOCAL_MACHINE\SYSTEM\CurrentControlSet\Services\WinSock2

Now delete the existing Winsock and WinSock2 keys from Registry and then re-add the same keys taken from a working computer which doesn’t contain Internet or networking problems.
PS: For your convenience, we are providing ready-made Registry script which will automatically delete the above mentioned keys and will also restore default working keys to fix the issue.
Download following ZIP file, extract it using 7-Zip or any other file archive utility and run extracted REG file. It’ll ask for confirmation, accept it:
Download Registry Script to Fix Windows Sockets Entries
After running the script, restart your computer and it’ll fix the issue and you’ll have a working Internet connection again.
11. Registry Method to Reset Class Managers Key in Windows
1. Type regedit in RUN or Start search box and press Enter. It’ll open Registry Editor.
2. Now go to following key:
HKEY_LOCAL_MACHINE\SYSTEM\CurrentControlSet\Control\Network\Connections
3. In right-side pane, you’ll see a multi-string key “ClassManagers“. Double-click on it and it’ll open the edit dialog box to change its value.
4. The dialog box will contain 4 GUIDs and each GUID must present on a separate line. If you find that all GUIDs are present in a single line, put them on separate lines by pressing Enter key after each closing curly bracket ‘}‘.
For your convenience, we are providing the correct value of the key. Copy following text and paste it in the edit dialog box:
{B4C8DF59-D16F-4042-80B7-3557A254B7C5}
{BA126AD3-2166-11D1-B1D0-00805FC1270E}
{BA126AD5-2166-11D1-B1D0-00805FC1270E}
{BA126ADD-2166-11D1-B1D0-00805FC1270E}

After correcting the value, click on OK button to apply changes.
5. Close Registry Editor and restart your PC.
PS: If you are not familiar with modifying registry, you can download following ready-made registry script to do the task automatically. Just download following ZIP file, extract it and run extracted REG file. It’ll ask for confirmation, accept it:
Download Registry Script to Reset Class Managers Key
12. Command-Line Method to Fix Network or Internet Issue
This method is specially for Windows 10 users who upgraded from Windows 7 or Windows 8.1.
1. Open Command Prompt as Administrator and run following commands one by one:
reg delete HKCR\CLSID\{988248f3-a1ad-49bf-9170-676cbbc36ba3} /va /f
netcfg -v -u dni_dne
2. Close Command Prompt and restart your system.
NOTE: If you receive 0x80004002 error code while executing the second command, it means the Registry key was not successfully deleted by the first command. In such condition, you’ll need to delete the Registry key manually using following steps:
1. Type regedit in RUN or Start search box and press Enter. It’ll open Registry Editor.
2. Now go to following key:
HKEY_CLASSES_ROOT\CLSID\{988248f3-a1ad-49bf-9170-676cbbc36ba3}
3. While you are on {988248f3-a1ad-49bf-9170-676cbbc36ba3} key, press Delete key to delete the key from Registry.
4. Now run the second command netcfg -v -u dni_dne in Command Prompt and it should work.
13. Disable or Remove Virtualization Software Adapter in Connection Settings
If you are using any virtualization software such as Virtual Box, VMware Workstation, etc in your computer, these software also install their virtual network adapters to use Internet connection in the virtually installed operating system. Sometimes these virtual network adapters can cause your Internet connection not working.
To fix it, just uncheck or uninstall these virtual network adapters from your Internet connection properties as shown in following image:

After disabling the virtual adapter, try to reconnect to Internet or network and now it should work fine.
14. Try Solutions Given in Following Articles
Following are some articles which we have posted in past to address networking and Internet issues. You can visit them and try other solutions to fix Internet and networking issues:
[Fix] Modern Apps Unable to Connect to Internet in Windows 10
[Fix] No Internet Access After Installing Feature Update in Windows 10
Comments
NOTE: Older comments have been removed to reduce database overhead. Be the first one to start the discussion.