How to Customize Login Screen Background Image in Windows 7?
Did you know Windows 7 comes with a built-in Registry tweak which allows you to easily customize or change the background image of Windows login screen (aka Welcome Screen)? Yes, using this secret feature you can set any of your favorite wallpaper as Windows 7 login screen background without using any 3rd party software.
Want to know how to do that? Just follow these simple steps:
1. Type regedit in RUN or Start Menu search box and press Enter. It’ll open Registry Editor.
Advertisement
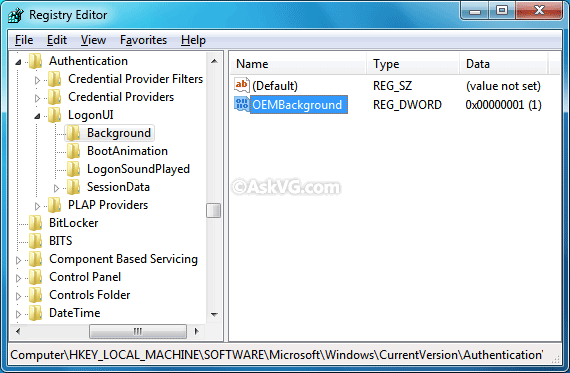
2. Now go to following key:
HKEY_LOCAL_MACHINE\SOFTWARE\Microsoft\Windows\CurrentVersion\Authentication\LogonUI\Background
3. Now in right-side pane, change value of OEMBackground to 1
PS: You can use following ready-made registry script to enable custom login backgrounds, no need to manually apply the tweak using 1-3 steps:
NOTE: If you don’t want to use the above mentioned Registry tweak, you can edit your current theme file present in “%windir%\Resources\Themes\” folder using Notepad and set the entry SetLogonBackground to 1 in [Theme] section. If you are using default Aero theme, you’ll need to edit aero.theme file in Notepad. Thanks to our reader “Charleston2378” for reminding us about this method…
Advertisement
4. Now go to following folder:
%windir%\System32\oobe
Here %windir% represents “Windows” folder present in the system drive where Windows 7 is installed.
5. Create a new folder “info” inside oobe folder. Then again create a new folder “backgrounds” inside info folder. So the final path would be:
%windir%\System32\oobe\info\backgrounds
6. Now copy any desired wallpaper to this new “backgrounds” folder but following conditions must be followed:
- The image name must be backgroundDefault
- The image format must be JPG
- The image size must be less than 256 KB

7. That’s it. Once you copy the wallpaper to “backgrounds” folder, your Windows 7 login screen will start using this new wallpaper as background. You can check the new login screen background by logging off or locking Windows.

PS: You can also use custom sized images based upon your screen resolution with the following names:
- backgroundDefault.jpg
- background768x1280.jpg (0.6)
- background900x1440.jpg (0.625)
- background960x1280.jpg (0.75)
- background1024x1280.jpg (0.8)
- background1280x1024.jpg (1.25)
- background1024x768.jpg (1.33-)
- background1280x960.jpg (1.33-)
- background1600x1200.jpg (1.33-)
- background1440x900.jpg (1.6)
- background1920x1200.jpg (1.6)
- background1280x768.jpg (1.66-)
- background1360x768.jpg (1.770833-)
NOTE: The backgroundDefault.jpg image is loaded and stretched-to-fit when a resolution/ratio-specific background cannot be found. If the background cannot be loaded (e.g. image physically too large, incorrect ratio, etc.), the default image is loaded from imagesres.dll file.
Also check: How to Customize Windows 7 Login Screen Text and Button Set.
If you want to use a free tool to customize Windows 7 login screen, check following list:
Ultimate Collection of the Best Free Tools to Customize Windows 7 Login Screen
Seems like people get lost in this process; follow this step by stem and it should get you there.
Do as follows:
1. click START and type REGEDIT in search bar
2. click on REGEDIT after it appears in results
3. Go to: HKEY_LOCAL_MACHINE\SOFTWARE\Microsoft\Windows\CurrentVersion\Authentication\LogonUI\Background
4. Double click on “OEMBackground”
5. Change value to 1 if it is not already; it may have been set to 0 previously
6. Next, go to HKEY_LOCAL_MACHINE\SOFTWARE\Policies\Microsoft\Windows\System
7. Double click “UseOEMBackground” and set the value to 1 if it is not already
Note: You may have to create the “key”; to do so Right-Click Anywhere on the right side window and click “New > DWORD (32 bit) Value.” Name the key UseOEMBackground and then double click the key like before and change the value to 1.
8. Close REGEDIT window once completed; your done with that part.
NEXT, is selecting the picture to be displayed as logon / login / lock screen window background.
Selecting a picture that is not over 256 is a must if you want it to actually work.
9. Open “Computer” in START menu.
10. Place pic at C:\Windows\System32\oobe\info\backgrounds and name it backgroundDefault (.jpg format) (“backgroundDefault” is case sensative)
Picture size is important!!! If it is too big it will not display. If it is not the correct proportions to start with, it will be S-t-r-e-t-c-h-e-D…
No need to restart your computer; just hit the windows command key and L at the same time; it will bring up lock screen.
Total time is about 5 minutes if your pic is right.
Peace
BTW, Not all Windows 7 Professional packages have the Group Edit feature… Mine from Dell did not.
is there any way i can bypass admin protection and get this done?
^^ Did you try following?
https://www.askvg.com/guide-how-to-take-ownership-permission-of-a-file-or-folder-manually-in-windows/
https://www.askvg.com/add-take-ownership-option-in-file-folder-context-menu-in-windows-vista/
Thanks! The tutorial was fast and efficient. Doable under 10 minutes or so. I suggest using this (blue version) mathieuberenguer.deviantart.com/art/Solaar-126359633
Hello,
I would like to have all my domain computers to have the same logon page background color without going to each one. What is the best way to do this?
Thank you,
Ricardo
Man, I wish It would work on Windows 8 because it’s logon is F^^k!ZG horrible!!!
Hi, I think for a non-tech person it will be little bit confusion to play with the registry editor. So, I think using third party apps like logon screen will be much easier.
Thanks
If I want to install custom logon screen with Windows installation without any prompt, how to do it? Thanks in advance.
Don’t forget to go to C:\HKEY_LOCAL_MACHINE\SOFTWARE\Policies\Microsoft\Windows\System and set UseOEMBackground to 1 hexadecimal.
Superb..!! It’s working and now i have no need to see that boring windows lock screen again..!! Thank you 🙂
i followed the full procedure but it is not work
target folder is not available what to do???
Thanks for info about size must me < 256 Kb!
I decided to put on the entrance to the windows here this picture
It turned out that it is difficult to compress the image so that the size was smaller than 256 KB, without JPEG artifacts…
I solved the problem this way: I have recorded a JPEG format, RGB (usually it is written in the YUV) using Color Quantizer. So get a good picture quality.
Not working for me. I have tied 4-5 times. Every web site that has directions for this says the same thing. I have followed the instructions, and it still does not show up. I have saved the backgroundDefault .jpg image (251kb) here: C:\Windows\System32\oobe\info\backgrounds and it does not show up when locked or logged off.
Never mind. It had to be even smaller than that. I got it to about 245kb and it worked.
NOTE
I made the mistake of named the file backgroundDefault.jpg
DO NOT add the suffix .jpg the file should be named only “backgroundDefault”
I cant edit the aero.theme i already download the take ownership thing but the computer still say access denied. Please help me.
^^ Open file’s properties and remove Read-only attribute. You can also copy the file to Desktop, then edit and save the file and then replace original file with it.
I deleted the original image in my “backgrounds” folder for the login screen and replaced it with a new one that has the same bakgroundDefault.jpg, and is below 256kb, but now the login screen just has the default blue background (windows 7 theme). I also can’t seem to put back the original image I had and make that work either. Any suggestions? 🙂
Confirming what Tim said earlier! The file size has to actually be under 250kb.
Tried using multible images in the range 250kb – 255kb and none of them worked. Shrunk it to 248kb, and KABLAM!… the magic happened.
doesnt work followed all the steps but still not WORKING
Hey, the file format can also be PNG as long as the file is named “backgroundDefault.JPG” and the file size is under 250kB 😉
I tried everything and it still wouldn’t work ***EXCEPT***, removing the “.jpg” from the photo name (which I had added to it), and it immediately worked!
The photo just needs to be a .jpg, but does NOT need it in the file name of the photo itself!
how about creating a reshacker batch script to automatically modify the logonui.exe resources with the custom image? the advantage, it works, size doesn’t matter that much, nor file size. a wallpaper restriction of 250 or less KB is not exactly great. i preffer editing the resources…
It’s not working.. I have tried 4 5 times as followed instruction..
My system is 4 bit ? Is the procedure is same
FYI: the size 256KB is “Size on Disk” (from properties) not the “Size” you get from details on folder view. In case you try to squeeze every bit (quite literally) to have better picture and are wondering why it doesn’t work.
Name the image only “backgroundDefault”. not include “jpg”.
thanks VG. this works!
I’m not a beginner, I have 20 years of IT experience. Still, I wasted 4 hours in vain trying to change the blue login wallpaper on W7pro and tried all the procedures on the internet many times, even though they are so simple. Nothing works, I guess I should retire.
(If someone advises not to add a .jpg extension, it’s probably their mistake, when the system is set not to display known extensions. So it already has one extension, but it doesn’t see it.)