[Tip] Customize Microsoft Office Click-to-Run (C2R) Setup to Install Selected Programs Only
NOTE: This tutorial will work for Office 2013 and later versions such as Office 2016 and Office 2019.
Since the release of Office 2010 version, Microsoft has started using a new virtualization technology to distribute Office setup and installation files to users and the technology is called “Click-to-Run” or “C2R Installer“.
In older Office versions such as Office 2003, 2007, etc, Microsoft used to provide traditional MSI (Windows Installer) to Office users to install Office suite in their computers. The MSI installer allowed users to select or deselect desired Office programs at the time of installation so that the Office setup wizard installs only selected programs.
Advertisement
On the other hand, the new C2R installer is an absolute different type of program which actually streams Office setup files from Microsoft servers. Its an online installer which downloads Office files at the time of installation. The benefit of this installer is that it lets you use the downloaded Office programs before the whole Office suite is installed in your computer. Also with the help of C2R installer, you can install multiple Office versions side-by-side in same computer.
But there is a big disadvantage in this new Click-to-Run installer technology! This new C2R installer doesn’t allow you to select/deselect Office programs at the time of installation so the installer downloads and installs all available Office programs. If you want to install only selected programs such as Microsoft Word, Excel and PowerPoint, you can’t do that with C2R installer. It’ll install all Office programs without asking for your choice.
Fortunately Microsoft provides an official tool to customize Click-to-Run installer options so that you can force the installer to install your desired Office programs only.
This tool is called “Office Deployment Tool” and is available for Office 2013, Office 2016 and Office 2019 versions. With the help of this tool, you can download Office setup files at your desired location and then configure the installer to install your selected Office apps only. You can also select which language should be installed and also customize lots of setup options.
You can consider this deployment tool as an unattended setup of Microsoft Office suite. You can force the Click-to-Run installer to suppress the whole setup UI. Also you can set whether Office should automatically update itself or not.
If you want to customize Office setup and want to install selected Office programs using Click-to-Run (C2R) installer in your computer, check out following simple steps:
Table of Contents
STEP 1: Download Office Deployment Tool
First of all, download the official tool from Microsoft website:
Advertisement
Download Office 2013 Deployment Tool
Download Office 2016 and Office 2019 Deployment Tool
STEP 2: Run Deployment Tool to Extract Required Files
Once you download Office Deployment Tool, run it and it’ll ask you to select a folder to extract the files. Select any desired folder and it’ll extract following 2 files in that folder:
- configuration.xml
- setup.exe

STEP 3: Edit Configuration.XML File
“Configuration.xml” file is the main file which will be used to tell the Office installer details about all setup options. We’ll provide all required information in this XML file to force the installer to install only selected Office programs with predefined things. You can consider this XML file as an automatic answer file which is used in unattended software installations.
We’ll use Notepad to edit this XML file. To edit the file, right-click on “configuration.xml” file and select Edit option. It’ll automatically open the file in Notepad.

By default, the file contains basic information to help you in easily modifying the file. Everything is marked as comment and you’ll need to remove the comment marks to make it a working configuration file.
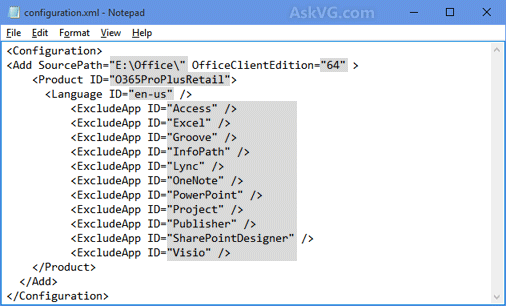
Copy following code and replace the existing code in the file with it:
<Configuration>
<Add SourcePath=”E:\Office\” OfficeClientEdition=”64” >
<Product ID=”O365ProPlusRetail“>
<Language ID=”en-us” />
<ExcludeApp ID=”Access” />
<ExcludeApp ID=”Groove” />
<ExcludeApp ID=”InfoPath” />
<ExcludeApp ID=”Lync” />
<ExcludeApp ID=”OneNote” />
<ExcludeApp ID=”PowerPoint” />
<ExcludeApp ID=”Publisher” />
<ExcludeApp ID=”SharePointDesigner” />
</Product>
</Add>
</Configuration>
Now some important things to know!
The information given in BOLD in the above code can be modified according to your requirements. For example:
SourcePath:
Set the value of “SourcePath” to the desired folder which should store the Office setup files downloaded by C2R installer.
OfficeClientEdition:
If you want to download and install 32-bit (x86) version of Office suite, set value of “OfficeClientEdition” to 32. If you want to download and install 64-bit (x64) version of Office suite, set its value to 64.
Product ID:
This variable contains the information about the main product which you want to install using C2R installer. You can set any of following as its value according to your requirements:
ProPlusRetail
ProfessionalRetail
HomeStudentRetail
HomeBusinessRetail
O365ProPlusRetail
O365HomePremRetail
O365BusinessRetail
O365SmallBusPremRetail
VisioProRetail
ProjectProRetail
SPDRetail
Language ID:
You can set which language should be installed by the installer. You can set its value to your desired locale and language information such as en-us, hi-in, ja-jp, etc.
ExcludeApp ID:
That’s the most useful variable which we need to specify to force C2R installer to install only selected Office programs.
This variable is optional. You can use this variable multiple times as we have used in the above code, to specify which Office programs should NOT be installed by the installer. So set its value to the programs which you don’t want to install i.e. exclude from your computer.
You can set its value to any of following:
Access
Excel
Groove
InfoPath
Lync
OneNote
Outlook
PowerPoint
Project
Publisher
SharePointDesigner
Visio
Word
That’s it. After providing required information save the XML file.
STEP 4: Download Office Setup Files
Now we need to download Office setup files using the setup.exe file. But it’ll not work if you try to direct run the setup.exe file.
1. Open the folder containing setup.exe and configuration.xml files. Now press and hold SHIFT key on your keyboard and then right-click on empty area in the folder. You’ll see a new option “Open command window here” or similar, click on it. It’ll open Command Prompt window with the current directory active.
2. Now type following command in Command Prompt and press Enter:
setup.exe /download configuration.xml

If you have set the “configuration.xml” file correctly, the setup.exe file will immediately start downloading Office files. You’ll notice a new folder “Office” created by the installer in the same folder which you defined in “SourcePath” variable in configuration.xml file. If you open this new folder, it’ll contain Office setup files which are being downloaded by the setup.exe file.

Downloading all Office files may take some time depending upon your Internet connection speed.
Once the download process finishes, the Command Prompt window will return to current directory.
STEP 5: Run Office Installer to Install Selected Programs
Now the final step! We need to run the setup.exe file with correct parameters in Command Prompt to install selected Office programs with our predefined settings in configuration.xml files.
Run following command in Command Prompt:
setup.exe /configure configuration.xml

That’s it. It’ll immediately start installing your desired Office programs in your computer.

It’ll take some time in installing Office suite in your computer.
BONUS TIP:
You can also provide the product key to the installer using configuration.xml file so that you don’t need to type product key manually. Just add following line to the code:
<Product PIDKEY=”11111-11111-11111-11111-11111“>
Replace “11111-11111-11111-11111-11111” with the correct product key.
OMG this Worked Perfectly !
Thank you so much 🙂
There are two things that I don’t understand.
First, for the SourcePath, is that just a folder you create or is that the default directory that Office would normally be installed in?
Second, to insert the Product PIDKEY, does that go before the last Product?
Sorry to be so dense.
What if I already installed it? Is there any way to choose what to keep and what to uninstall?
Bro, you’re a life saver. I have no idea what kind of quality protocols Microsoft has in place nowadays, but not giving people the option to exclude things from an installation as big as this one is just stupid.
Again, thanks for this.
Is it possilble to use this configuration file to install Office on my d: drive instead of the default c:?
^^ Not possible.
Hi VG!
I have had downloaded Office 2016 Home & Student Edition in your way. Now, an error message “We can’t install – This product can’t be installed on the selected update channel. Please contact your system administrator and try again.” is being occurred whenever I am trying to install office after perform clean installation of Windows 10 Pro x64.
——————-
<!– –>
<!– –>
<!– –>
——————-
Thanks
Probably, now we can’t download Office 2016 installation for fresh installation as the channel attribute has been changed.
Hello VG,
is it possible to change the install folder for Office? Or can i just decide an other download folder?
I´m using the officedeploymenttool, my XML looks like this
so i just want to change the folder where office should be installed.
When i start the download, there comes this message:
Office couldnt install
Error code:30029-1007 (0)
Configuration
Add SourcePath=”E:\Office” OfficeClientEdition=”64″
Product ID=”ProPlusRetail”
Language ID=”de-de” /
/Add
/Configuration
Hi! So, I am trying to install only powerpoint, word, and excel. I’ve excluded everything else. The reason is, my laptop has next to no space in it. If I install my Student Office 365 subscription, it takes up 1.2GB of space. My thought process is, if I install fewer programs, it should take less space. Right?
Anyway, my problem starts with the first command prompt step. It starts fine, then it gives me “Error Code: 30029-1007 (0)”. It asks me if I’m connected to the internet (which I am), and if I have enough space (I have 5GB or so). So I dunno what’s up.
Here’s my XML part:
Of course, my product key is in there instead of the 1s. Anyway, please help! Thank you so much in advance!
The problem is, when I connect to my office 365 account, it installs all missing features. Do you have any solution for that?
Hi VG, I’m following all the steps and everything works fine until the start of the installation, it appears the window with the intalling office message but it keeps with a 3% of progress for more than 2 hours, while the regular office 2016 installation only take me around 10 minutes, never goes higher or complete. Is it a problem with the configuration.xml?
Thanks in advance!
PS: I’m installing the ProPlusRetail, in the source path C:\Office\ and OfficeClientEdition=”64″. I’m using W10.
Loved these instructions for Office 2016. Things seem to have changed for Office 2019. Any chance we could see an updated guide? I really, really don’t have to install Outlook if I can avoid it. Thank you!
When I downloaded the Office Deployment Tool and ran it, I have 3 config files: one for Office365-x64, one for Office365-x86, and one for Office2019Enterprise. I’m trying to install Office2016. Can I use the Office2019 version? If so, should I replace all the 2019 with 2016?
I have the Office Professional Plus 2013 disk, so I’m guessing I don’t need to do step4 – “Download” …
But how do I get this to work by accessing the relevant files on the disk?
Thanks!
@Maria
its because your configuration.xml is name differently ex: “configuration-Office365-x64.xml”
so it cannot found it.
INSTEAD OF USING NOTEPAD TO EDIT THE XML, USE NOTEPAD++
Using notepad usually causes some errors with the installer
How to download Office 2019 Home and Business 64-bit version only? What should be the “Product ID”?
It is really ridiculous that we need this, but it worked like a charm!
Thanks a lot sir.
And of course the most important one:
😛
Looks like there isn’t a product id suitable for microsoft partner program multilicense, volume does not work nor retail, the only working (and very ugly solution) is to install full product using their iso, activate office then reinstall trimmed down using c2r deploiment tool.
Or there is an alternative?
Thanks
Thank you for this post – most helpful!
Howdy.
Attempting to use the Office Deployment Tool to only add selected applications vice the entire Office 2019 Pro Plus package.
Read your article and also used the MS online tool to create a configuration.xml file listed below.
Long explanation follows.
The vendor provided me with a Setup32.exe and Data directory containing various cab files to include another Setup.exe and a C2RFireFlyData.xml which contains various entries such as the various applications and their language.
Additionally, a directory 16.0.10730.20102 – which I presume is an IP address – contains additional cab files and stream.x86* files.
When I initially ran the configuration file I used the Setup32 but it barked that setup was not recognized blah blah.
Moved to the Data directory and ran cmd again but not as Admin and got dialog msg did I want application to make changes. Clicked Yes and nothing.
Ran cmd again but as admin and this time no dialog box displayed but a screen dump with the 1st line:
Dumping parameters content…and some of the entries in the configuration.xml file.
It did not list the applications to install nor if 32 or 64 bit.
And ended with a blinking cursor in the cmd window that upon hitting RTN brought me to the cmd line and nothing happening.
Appreciate your assistance and suggestions. Attempted to submit with comment with the configuration file contents but got Access Denied when hitting the submit btn so I removed it.
Thank you,
Rey
Howdy.
Earlier today I submitted a comment regarding issues I have with the custom install of Office 2019 ProPlus and a configuration file.
Guess I’ve been at this too long as I was attempting to run the deployment tool NOT from its downloaded directory but from the office path to the various cab files…DUH!
So now, running the ODT setup.exe from its unzipped location and with the configuration file, I now get a dialog box with the err code 30029-1011(0).
I have Office 2007 Pro installed on this box and do NOT want to uninstall it but add the new 2019 versions of Word, Access and Excel.
Any suggestions on how to proceed.
Also, in my previous post, I erred in stating that 16.0.10730.20102 was an IP address – NOT. It is the version of Office Proplus I was provided I believe.
Thank you,
Rey
How does the installer know in I want do download version 2016, 2019 or 365?
I need 64 bit for all apps EXCEPT MS Access. For that, I need 32 bit.
How can I modify these instructions to do that?
I recently downloaded the Office365 (Premium Home) file to see how I could change what’s getting installed.
In your above example of the extracted file you mention to use office deployment tool and use it to extract the files “configuration.xml” and “setup.exe”.
The Office 365 file I downloaded differs from what you show in that it has a folder containing “Office” in which is a folder “Data” that contains another folder (16.0.13127.20616) and several cab files. The Office folder also contains 2 versions of Setup: Setup32 and Setup64.
The Data folder has a file named “C2RFireflyData.xml”that has the same info as your configuration.xml file.
I’m almost sure I have to modify that C2R file, but confused about which setup file I have to modify too. The root setup.exe of one of the setup versions in the Office folder?
Anyone willing and able to advise? It’s greatly welcome.
What is the Product ID for Microsoft 365 Family?
I have created .xml and downloaded Office 365 from each product. So I created a separate Word product, a separate Excel product, a separate Outlook product, a separate PowerPoint product, and so on.
What I want to ask is, when, for example, Word has finished installing, and I want to continue installing, for example, Outlook, then the results of the previous successful Word installation are lost. I checked the shortcut in the start menu, it wasn’t there, in the Program Files it wasn’t there either. There is only Outlook. Then I tried again to install another product, for example Excel, until it was finished. The same thing happened, Outlook which was previously successfully installed was lost, there were no shortcuts in the start menu and Program Files.
I hope you can help…