How to Use Miracast Wireless Display or Screen Mirroring Feature in Windows 8.1 or Later?
With the release of Windows 8.1 operating system, Microsoft has added a new and welcomed feature to the OS which is Miracast Wireless Display also known as Screen Mirroring. With the help of this new feature you can project your computer screen display to a wireless device such as a projector, a TV set or a streaming media player.
Today in this tutorial, we are going to tell you how to use this new feature in Windows 8.1 or later so that you can share your computer screen display with other devices wirelessly.
To be able to use Miracast or Screen Mirroring feature both source as well as receiver devices must have Miracast support. When you are trying to project your computer display to a TV or projector, your computer is the source and TV or projector is the receiver.
Advertisement
Almost all new computers which have Windows 8.1 installed, come with Miracast support and if your TV or projector contains an option for Screen Mirroring, it also has Miracast support.
Once you are sure both source and receiver devices have Miracast Wireless Display support, you can follow these simple steps to project your Windows 8.1 computer display to a wireless device using Miracast or Screen Mirroring feature:
Table of Contents
STEP 1: Prepare Miracast Receiver Device
First of all put your wireless receiver device in Screen Mirroring mode. If you are planning to project your computer display on your HDTV, select Screen Mirroring option present in INPUT or source mode.
Now your device will start searching for the source device.
STEP 2: Project Computer Display to Receiving Device
Now in your Windows 8.1 computer, open Charms Bar. You can access Charms Bar by moving your mouse cursor to top-right corner or bottom-right corner of the screen. Alternatively, you can also show Charms Bar by pressing WIN+C keys together.
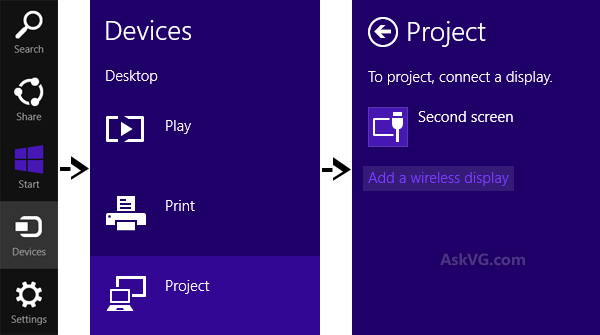
Now click on Devices option given in Charms Bar and then click on Project option.
PS: You can also press WIN+P keys together to direct access Project screen.
Advertisement
If your computer has Miracast support, you’ll see Add a wireless display option in Project screen. Click on this option.
It’ll start searching for wireless receiver device and will find your TV or projector device in the search results.
Click on the receiver device and Windows will start installing required drivers for the device.

Within a few seconds your wireless receiver device i.e. TV or projector will start mirroring your computer display.
STEP 3: Disconnecting Miracast Wireless Display
When you want to disconnect the Screen Mirroring or display projection, you can either exit from Screen Mirroring mode in your TV or projector or you can select Disconnect option from Charms Bar -> Devices -> Project or WIN+P screen.
Its really a nice and helpful feature introduced in Windows 8.1 which helps in sharing your computer display with big TV screens and projectors without connecting them with wires or cables…
I want to convert my pc into a miracast receiver device is it possible…..?
Thanks
Will this work if I wanted to use my chromecast dongle as the wireless receiver?
^^ It might work. I have not tried.
@Vidya Sagar
There are dongles available to bring Miracast support.
My lenovo pc and lg tv connect then disconnect within in a minute, won’t stay connected.
any solutions?
^^ It might be some settings or hardware incompatibility problem.
hello, i tried that but my laptop’s screen just goes black and so does my bravia tv. help please 🙂
question. a friend of mine has his computer working fine with mirroring on a big screen tv. now it stopped working. it says no signal. what’s the most probable issue. the hdmi cable itself or hardware. it was working nicely for a while. thanx