[Guide] Best Privacy Settings for Windows 10 to Disable Telemetry and Data Collection
Since when Windows 10 development started and free Insider Preview build released to public, there have been lots of talks about Windows 10 privacy policy, data collection and telemetry. Even after the final release of Windows 10 operating system, lots of people are still worried about their privacy in Windows 10. People think that Microsoft is collecting their personal data in Windows 10 OS which is absolutely wrong. Microsoft just collects some required basic data anonymously to improve Windows 10 functionality and suggestions which are given by the OS to the end user i.e. you.
If you are also worried about Windows 10 privacy issues and want to get maximum privacy in Windows 10, this topic will definitely help you. In this topic, we’ll provide you a list of best privacy settings for Windows 10 which will allow you to disable automatic data collection and telemetry in Windows 10 and will help you in getting as much privacy as you can get in the OS. You’ll be able to configure Windows 10 privacy settings quickly and easily with the help of this guide.
So without wasting time lets start our beginner’s guide to Windows 10 privacy settings:
Advertisement
Actually Windows 10 allows you to configure lots of settings to improve your privacy at the time of Windows 10 installation as well as after installation. That’s why we are dividing this tutorial in two parts:
- PART 1: Configure Windows 10 Privacy Settings at Installation Time
- PART 2: Configure Windows 10 Privacy Settings after Installation
Here are the details of both parts:
Table of Contents
- PART 1: Configure Windows 10 Privacy Settings at Installation Time
- PART 2: Configure Windows 10 Privacy Settings after Installation
- STEP 1: Open Settings App
- STEP 2: Customize General Privacy Settings
- STEP 3: Customize Network and Internet Privacy Settings
- STEP 4: Customize Windows Updates Privacy Settings
- STEP 5: Customize Windows Defender Privacy Settings
- STEP 6: Disable Advertisements, Suggestions and Tips
- STEP 7: Disable Windows Error Reporting Service
- STEP 8: Disable Customer Experience Improvement Program
- STEP 9: Disable Automatic Diagnostic Program
- STEP 10: Disable Typing Insights Feature
PART 1: Configure Windows 10 Privacy Settings at Installation Time
If you are going to install Windows 10, then PART 1 will be very helpful to you. But if you have already installed Windows 10, you can skip to PART 2 to configure privacy settings.
When you run Windows 10 setup, after a few minutes of installation the OOBE (Out-of-Box Experience) wizard starts to allow you customizing various settings related to Windows 10.
It contains 2 buttons: Use Express settings and Back. Most of the people click on “Use Express settings” button but they miss a tiny link “Customize settings” given at the bottom-left corner of screen. I wonder why Microsoft put that essential link there? They should have put the link near Express settings button to help users.

Anyway instead of clicking on Express settings button, click on Customize settings link so that you can configure various privacy settings at installation time.
Advertisement
After clicking on Customize settings link, you’ll be provided with a screen where you can turn various privacy options on or off according to your requirements.
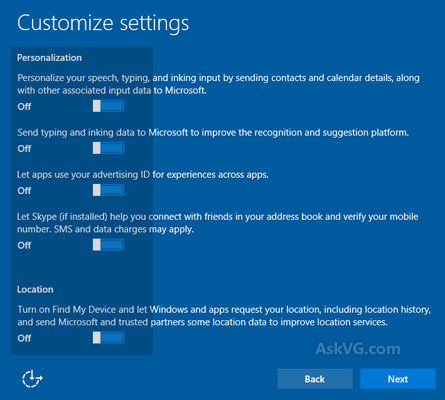
The first screen contains privacy options related to Personalization and Location. To maximize your privacy set all available options to Off:
- Personalize your speech, typing, and inking input by sending contacts and calendar details, along with other associated input data to Microsoft – OFF
- Send typing and inking data to Microsoft to improve the recognition and suggestion platform – OFF
- Let apps use your advertising ID for experiences across apps – OFF
- Let Skype (if installed) help you connect with friends in your address book and verify your mobile number. SMS and data charges may apply – OFF
- Turn on Find My Device and let Windows and apps request your location, including location history, and send Microsoft and trusted partners some location data to improve location services – OFF
Click on Next button and you’ll be provided with another screen where you can customize privacy settings related to Connectivity and error reporting. For maximum privacy, you should set all options to Off:
- Automatically connect to suggested open hotspots. Not all networks are secure – OFF
- Automatically connect to networks shared by your contacts – OFF
- Automatically connect to hotspots temporarily to see if paid Wi-Fi services are available – OFF
- Send full error and diagnostic information to Microsoft – OFF

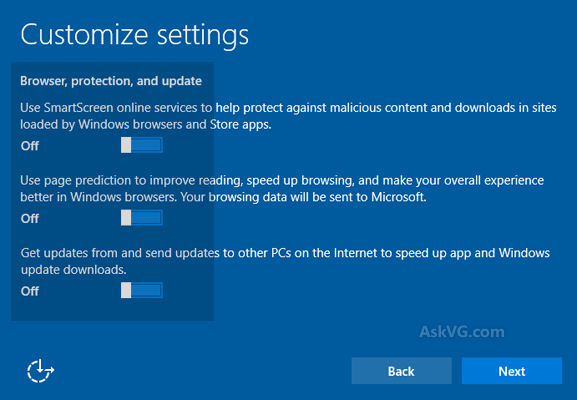
Again click on Next button and you’ll be provided with another screen where you can customize privacy settings related to Web browser, protection and Windows update. For maximum privacy, you should set the first option to On and set remaining options to Off:
- Use SmartScreen online services to help protect against malicious content and downloads in sites loaded by Windows browsers and Store apps – ON
- Use page prediction to improve reading, speed up browsing, and make your overall experience better in Windows browsers. Your browsing data will be sent to Microsoft – OFF
- Get updates from and send updates to other PCs on the Internet to speed up app and Windows update downloads – OFF
Above are the all privacy settings which can be customized at Windows 10 installation time.
UPDATE:
In newer Windows 10 versions, the customize privacy settings screen has been changed and look as following:

For best privacy experience, you just need to set all toggle options to OFF/NO. Set location, relevant ads, speech recognition, tailored experiences with diagnostic data options to OFF/NO and set Diagnostics option to BASIC.
PART 2: Configure Windows 10 Privacy Settings after Installation
If you have installed Windows 10 but didn’t customize above mentioned privacy settings at installation time and clicked on Express settings button, there is no need to worry.
You can still configure those privacy settings along with many other settings using Settings app:
STEP 1: Open Settings App
Open Start Menu and click on Settings option. It’ll open Settings app. Alternatively, you can direct open Settings app using WIN+I hotkey.
STEP 2: Customize General Privacy Settings
Now click on “Privacy” section. Here you can tweak and customize several settings to improve your privacy in Windows 10.
PS: Alternatively, You can directly launch Privacy section in Settings app using “ms-settings:privacy” command in RUN dialog box as mentioned here.
For your convenience, we are providing an easy list which will tell you which option should be set to On and which should be set to Off:
General:
Leave the third option enabled (Check this) and disable other remaining options:
- Let apps use advertising ID to make ads more interesting to you based on your app usage (turning this off will reset your ID) – OFF
- Let websites provide locally relevant content by accessing my language list – OFF
- Let Windows track app launches to improve Start and search results – ON

Location:
If you don’t use any app which requires your location, set the option “Location for this device” to OFF. Just click on Change button and turn the option off.

Also clear the location history by clicking on Clear button.
Camera, Microphone, Notifications, Account info, Contacts, Calendar, Call history, Email, Tasks, Messaging, Radios, Other devices, App diagnostics:
Set sliders in all these sections to OFF for maximum privacy settings.

If you are using any app which requires these options (such as Mail app may require contacts, calendar details), leave that option enabled. Otherwise disable these options.
Speech, inking, & typing:
If you don’t use Cortana (digital personal assistant), click on “Turn off speech services and typing suggestions” button to turn off the option.

Check out METHOD 3 in following tutorial to learn more about this option:
[Tip] Disable Cortana and Bing Search Results in Windows 10
Feedback & diagnostics:
a. Set “Diagnostic and usage data” option to Basic.

PS: Windows 10 Enterprise, Education, IoT and Server edition users can completely turn off the sending of diagnostic and usage data using Group Policy Editor. Type gpedit.msc in RUN or Start search box and press Enter. It’ll open Group Policy Editor. Then go to:
Computer Configuration -> Administrative Templates -> Windows Components -> Data Collection and Preview Builds
In right-side pane, double-click on “Allow Telemetry“, select Enabled option and then set the value to “0 – Off/Security” from the drop-down list. Apply changes. On other Windows 10 editions such as Windows 10 Home (Core) or Pro edition, this method has no effects.
Read More: Truth Behind Disallowing Telemetry and Data Collection Trick in Windows 10
b. Set “Let Microsoft provide more tailored experiences with relevant tips and recommendations by using your diagnostic data” option to OFF.
c. If you want to help Microsoft in improving Windows 10 by providing your valuable feedback, you can set the option “Feedback Frequency” to Automatically, Always, Once a day or Once a week. If you don’t want to provide feedback to Microsoft, you can set the option to Never.
Also Check:
[Windows 10 Tip] How to View and Delete Collected Diagnostic Data
Background apps:
In this section, you can customize which apps can run in background to receive info, send notifications and stay up-to-date.
To conserve power and improve privacy you can set “Let apps run in the background” option to Off.

STEP 3: Customize Network and Internet Privacy Settings
Now go back to Settings main page and click on “Network & Internet” section. Now click on Wi-Fi tab and set following options to Off:
- Find paid plans for suggested open hotspots near me – OFF
- Connect to suggested open hotspots – OFF

STEP 4: Customize Windows Updates Privacy Settings
Again go back to Settings main page and click on “Update & security” section. Now in Windows Update tab, click on “Advanced options” link.
PS: Alternatively, You can also directly launch the advanced options page of Windows Update settings using “ms-settings:windowsupdate-options” command in RUN dialog box.
Now click on “Choose how updates are delivered” link and set the slider to Off given under “Updates from more than one place“.

Check Step 5 of METHOD 1 in following tutorial to learn more about this option:
Fixing Windows 10 Automatic Updates Install Problem
STEP 5: Customize Windows Defender Privacy Settings
Also disable telemetry options in Windows Defender tab as mentioned in following tutorial:
[Windows 10 Tip] Disable Data Collection and Telemetry in Windows Defender

STEP 6: Disable Advertisements, Suggestions and Tips
Windows 10 occasionally shows advertisements, suggestions and tips in Action Center, Start Menu, Lock Screen, Windows Explorer, etc. As you can see in following screenshot, Start Menu is showing a 3rd party app suggestion at the top:

You can turn off all these ads and suggestions to improve your privacy. Following tutorial will help you in disabling all kind of ads and suggestions in Windows 10:
[Tip] Disable Advertisements, Suggestions and Tips in Windows 10
STEP 7: Disable Windows Error Reporting Service
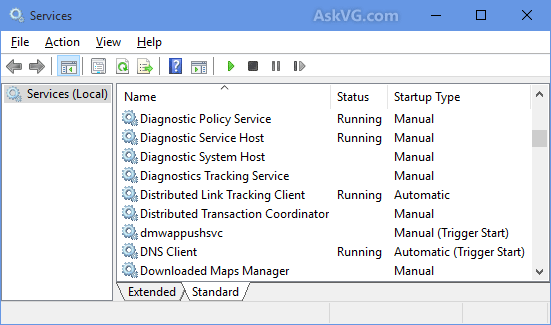
You can also set “Windows Error Reporting Service” to MANUAL using Services Manager to prevent Windows 10 from sending error and diagnostic information to Microsoft.
Also set “Connected User Experiences and Telemetry“, “Diagnostic Tracking Service” and “dmwappushsvc” services to MANUAL or DISABLED in Services Manager to turn off telemetry and data collection in Windows 10.
Check out following tutorial to learn how to configure Windows 10 services using Services Manager:
[Guide] Which Windows 10 Services are Safe to Disable?
STEP 8: Disable Customer Experience Improvement Program
Also check out following tutorial to disable secret “Customer Experience Improvement Program” (CEIP) which automatically collects and sends usage data to Microsoft:
[Tip] Disable “Customer Experience Improvement Program” (CEIP) in Windows

STEP 9: Disable Automatic Diagnostic Program
You can also follow the METHOD 4 given in following article to disable automatic diagnostic logger (aka Microsoft Compatibility Appraiser), if exists in your Windows 10 computer:
[Tip] Disable Telemetry and Data Collection on Windows 7, 8 and 8.1
STEP 10: Disable Typing Insights Feature
You can also disable text suggestions, autocorrections, SwiftKey suggestions and Typing Insights feature in Windows 10 which allows Windows 10 to collect users typing data.
[Tip] Stop Windows 10 from Collecting Your Typing Insights Data
That’s it guys. After customizing all these settings, you should not be worried about privacy issues in Windows 10. You are good to go.
You can also check out following tutorials to disable unwanted stuff and get classic features back in Windows 10:
- [Tip] Disable OneDrive in Windows 10
- [Tip] Disable Notifications and Action Center in Windows 10
- [Tip] Restoring Classic Programs and User Interface in Windows 10
- [Guide] How to Remove All Built-in Apps in Windows 10
- [Windows 10 Tip] Remove Cortana, Microsoft Edge, Contact Support and Feedback Apps
Also Check:
[Tip] Disable Telemetry and Data Collection on Windows 7, 8 and 8.1
Do You Need to Worry About Privacy in Windows 10? Answer is NO
I will still advise users to go through all options under Settings→Privacy with a fine tooth comb. I have noticed that some of these settings can compromise your privacy EVEN THOUGH I chose “Customize settings” during installation.
One other thing: Hit Win + S to open Search, then click on the Gear icon and turn off both sliders in the right pane.
But what about those some options (I have heard, Maybe in EDGE/Telemetry; not sure ) that reverts back to ON[default] state even when you set them OFF.
Any fix for those ??
the problem with this is that even following this entire article of disabling every privacy telemetry settings, Windows 10 will still send data to MS behind-your-back… both Home and Pro edition. Only Enterprise edition will fully shut off telemetry, data, and tracking, but they’re overpriced and only available for Large Organization-/Business-Only rent.
In other words, even when appeared turned-off, Widows 10 still treats it like nothing has been touched or changed. and resumes telemetry
If your worried about your privacy, you shouldn’t be on the internet!
The information you’re sharing with Microsoft, you’ve already shared many times simply by browsing the Web.
Smart Screen should also be set to OFF.
It transmit data ti Microsoft about each program you install – name, version, producer and SHA – at least, so it can tell you if it’s trusted or not.
However this is useless – new version of software will be considered always as not-trusted – may take several days until launch to be put on the whitelist.
Also, even with this set to Off for system, In IE and Edge it may remain active – so it will work when downloading. If you want better Privacy should be set to OFF.
Also what about indexing service and Cortana ?? Cortana need the files on your drives to be indexed, and it also comunicate with Microsoft Servers…. Should be shut down too…
And I forgot – the weird thing – it’s happened several times until now, that after installing updates some settings go to ON by themselves.
Anyway these are only a part of the settings in W10 – some however cannot be shut down.
If you want privacy – run Linux ( take care however what distro – some also may transmit some data to their producers ), or don’t use internet or never use a electric/electronic device. Just go somewhere in the mountains…
Hi,
I have already loaded W10 when it came out.
I am interested in your expert privacy assistance, but I do not know how to get to the large blue box “CUSTOMIZE SETTINGS”.
I hope to get to the start of the Customize Settings and then keep going.
Thank you for sharing your assistance.
John Blackburn
8-30-15
4:47 CST
The problem your Windows still send data in the background. And Microsoft updated his privacy statement and one of them is Name and Contact Data, Payment Data
Hi VG!
I followed another tutorial in which was stated to delete the DiagTrack and dmwappushsvc services. Is there any way of getting those services back ?
Thank you!
^^ You’ll need to run sfc /scannow command in Command Prompt or use Reset this PC feature or repair Windows using setup disc.
Very good sugestions, I just checked if I have it right and it came out I’ve configured it such way by myself 😀 Well, maybe excluding Smart Screen – I disable it. Small suggestion – I guess it would be easier/faster to use/tweak those if the order given by you were the same as it is in Settings App? But I am stickler to the details, so maybe it is my personal feeling 😉
Just in case anyone’s wondering, I only stumbled upon this last night after using this guide religiously. If you’re having trouble finding “Get fun facts, tips, and more on your lock screen” under the Lock Screen options, set Background to “Picture” instead of the default Slideshow under the Lock Screen options.
This works on all Windows 10 versions.
Please, teach me how to remove ALL BUILT-IN SHORTCUT ICONS that appear on startmenu (on the right side) in Windows 10. Thanks for your help.
I have Windows 10 Home and I am new to this OS, however not all of what you show is listed in any part of my system or services so I could only follow what I could find.
I am not new to windows services or regedit, I have used them many times.
Hi,
Is there any article related to “Suggested content” or “Targeted ads” and how to remove them?
As I did some research online, found someone mentioning how changing registry values on SubscribedContent* entries in HKEY_CURRENT_USER\Software\Microsoft\Windows\CurrentVersion\ContentDeliveryManager might do the trick.
Do you have an article on this or plan to expand on the subject through an already written article?
^^ Check following:
https://www.askvg.com/registry-tweaks-to-disable-ads-suggestions-and-tips-in-windows-10/
camera not working