Collection of Useful Stylish Scripts to Customize Mozilla Firefox UI
We have posted several exclusive tutorials to tweak and customize Mozilla Firefox web browser in past. Some of them can be found at following links:
- [Did You Know] Ultimate Collection of Mozilla Firefox Hidden Secret Features
- Ultimate Collection of Best “about:config” Tweaks for Mozilla Firefox
Today in this tutorial, we are going to share some useful Stylish scripts to customize Firefox UI. All these tips have been shared by our reader “Travis The Firefox User“, so a big thanks goes to him.
Stylish is a popular and widely used add-on or extension for Mozilla Firefox. It allows you to customize Firefox user interface on the go. You just need to install the add-on and apply CSS codes using it. This add-on also allows you to customize any website look-n-feel.
Advertisement
The Stylish codes given in this tutorial will help you in customizing tab bar, menus, new Firefox Hamburger (Australis) Menu and toolbar buttons in Firefox web browser.
If you are ready to customize Firefox UI, check out following exclusive guide:
Table of Contents
- [IMP] How to Install and Use Stylish and CSS Codes
- Put Website Favicon on Right and Close Button on Left in Tabs
- Add Icons to Menubar and Context Menus
- Show Items in Firefox Hamburger Menu in List View
- Colorize Firefox Toolbar Buttons
- Replace Firefox Hamburger Menu Icon with Calendar
- Put Firefox Hamburger Menu on Left
[IMP] How to Install and Use Stylish and CSS Codes
First of all you’ll need to install Stylish add-on in Firefox using Add-on Manager.
After installing add-on, you’ll get a new icon of this add-on in Firefox toolbar which allows you to apply or manage CSS codes. Alternatively, you can access Stylish options using Add-ons (about:addons) page.
There are 2 ways to apply a CSS code using Stylish add-on:
1. If you have the CSS code with you, select “Write new style -> Blank style” option from Stylish menu and then paste the CSS code in the window and click on Save button. It’ll immediately apply the code.
2. If you are going to apply a CSS code from the popular userstyles.org website, you just need to click on “+Install with Stylish” button given at the CSS code page and it’ll apply the code.
Advertisement
So without wasting time, lets share the CSS codes:
This code will move the website favicon to the right and Close button to the left on tabs in Firefox Tab bar similar to Safari web browser.
This code might be very useful for people who have switched to Firefox from safari.

Just paste following CSS code using Stylish’s “Write new style -> Blank style” option:
.tab-content { -moz-box-direction: reverse !important; }
Alternatively, you can paste above mentioned code in userChrome.css file present in Firefox profile folder. If you don’t know about this file and profile folder, check out this tutorial.
Also Check: How to Move Scrollbar from Right to Left in Mozilla Firefox?
If you are a user who prefer icons on menus, this code is for you. This code adds icons to Menu bar and context menu items.
Icons in Context Menu:
![]()
Icons in Menu Bar:
![]()
Simply install the code given at following link:
This code will remove unnecessary big icons from new Firefox Hamburger Menu and will show the items in list view.

You can also select whether you want to show menu icons or not in list view. Also you can select the number of columns in list view.
Just apply the code given at following link:
Show Firefox Hamburger Menu Items in List View
This code will colorize various toolbar and menu buttons to make them look nicer.
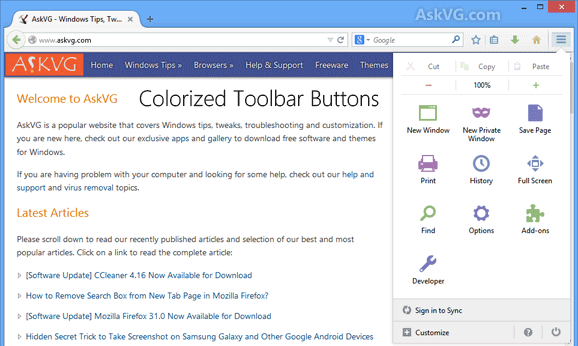
Apply the code given at following link:
Colorize Firefox Toolbar Buttons
This code will replace the toolbar icon of Firefox Hamburger Menu with current date and month.

Apply the code given at following link:
Replace Firefox Hamburger Menu Icon with Calendar
This code will move Firefox Hamburger Menu to the left of the toolbar.

This code can be applied using both Stylish and userChrome.css file.
If you want to apply the code using Stylish, install the code given at following link:
Move Firefox Hamburger Menu to the Left
Or you can paste following code in userChrome.css file:
@namespace url(“https://www.mozilla.org/keymaster/gatekeeper/there.is.only.xul”);
@-moz-document url(“chrome://browser/content/browser.xul”) {
#PanelUI-button, #customization-panel-container,
#customization-panelWrapper .panel-arrow,
#ctr_panelui-button,
#wrapper-ctr_panelui-button {
-moz-box-ordinal-group: 0
}
#PanelUI-button {
background-position: 100% 0, calc(100% – 1px) 0, calc(100% – 2px) 0;
}
}
That’s it. Feel free to share your feedback in your comment. If you know about any other interesting trick for Firefox, please share it with us…
Also Check:
15 Tips-n-Tricks to Tweak and Customize Mozilla Firefox Web Browser
[Fix] userChrome.css and userContent.css Codes Stopped Working After Firefox Upgrade
Gives input boxes a border and blue outline:
input {
outline:none;
border-radius:2px;
-webkit-border-radius:2px;
-moz-border-radius:2px;
border:2px solid rgba(0,0,0, 0.2);
}
input:focus {
box-shadow: 0 0 1px #33b5e5;
-webkit-box-shadow: 0 0 1px #33b5e5;
-moz-box-shadow: 0 0 1px #33b5e5;
border:2px solid #33b5e5;
}
select {
outline:none;
border-radius:2px;
-webkit-border-radius:2px;
-moz-border-radius:2px;
border:2px solid rgba(0,0,0, 0.2);
}
select:focus {
box-shadow: 0 0 1px #33b5e5;
-webkit-box-shadow: 0 0 1px #33b5e5;
-moz-box-shadow: 0 0 1px #33b5e5;
border:2px solid #33b5e5;
}
Tabs on bottom (works only when maximized, might look funky with titlebar)
@namespace url(“https://www.mozilla.org/keymaster/gatekeeper/there.is.only.xul”);
#browser-panel {
-moz-box-direction: reverse;
}
#nav-bar {
padding-top: 5px;
}
Always display back/forward arrows: (Not tested)
@-moz-document url(chrome://browser/content/browser.xul) {
window:not([chromehidden~=toolbar]) #navigator-toolbox[iconsize=large][mode=icons] > :-moz-any(#nav-bar[currentset*=”unified-back-forward-button,urlbar-container”],#nav-bar:not([currentset])) > #unified-back-forward-button[forwarddisabled] + #urlbar-container > #urlbar {
margin-left: 0px !important;
border-left: 1px solid #b4c2cf !important;
}
window:not([chromehidden~=toolbar]) #navigator-toolbox[iconsize=large][mode=icons] > :-moz-any(#nav-bar[currentset*=”unified-back-forward-button,urlbar-container”],#nav-bar:not([currentset])) > #unified-back-forward-button:not(:hover) > #forward-button[disabled] ,
window:not([chromehidden~=toolbar]) #navigator-toolbox[iconsize=large][mode=icons] > :-moz-any(#nav-bar[currentset*=”unified-back-forward-button,urlbar-container”],#nav-bar:not([currentset])) > #unified-back-forward-button:hover > #forward-button[disabled] {
opacity: 1.0 !important;
margin-right: -2px !important;
}
window:not([chromehidden~=toolbar]) #navigator-toolbox[iconsize=large][mode=icons] > :-moz-any(#nav-bar[currentset*=”unified-back-forward-button,urlbar-container”],#nav-bar:not([currentset])) > #unified-back-forward-button > #forward-button[disabled] > .toolbarbutton-icon{
border-top:1px solid #869aad !important;
border-bottom:1px solid #869aad !important;
}
window:not([chromehidden~=toolbar]) #navigator-toolbox[iconsize=large][mode=icons] > :-moz-any(#nav-bar[currentset*=”unified-back-forward-button,urlbar-container”],#nav-bar:not([currentset])) > #unified-back-forward-button[forwarddisabled] #back-forward-dropmarker{
visibility:visible !important;
}
}